In this tutorial I will show you how to create a basic table using only HTML elements, tags and attributes.
So...What are all those things?
An HTML Element defines the structure of what we are creating, in this tutorial the <table></table> tags and the coding that will be placed in between, create our Table Element.
An HTML Tag represents the beginning and end of an HTML Element. For example the <table> tag in the previous sentence combined with it's closing </table> tag defines the start of our element, which will be a table!
An HTML Attribute defines a specific property of an element or more specifically a single tag, basically telling the tag it's incorporated with, to fulfill a certain task; such as creating a border. For example the beginning table looks like this: <table border="1">. You'll notice the added word border inside the tag. The number 1 defines the thickness of the tables border.
In brief:
<table> represents an example of a single tag.
<table> (content coding goes here) </table> defines our element.
<table border="1"> represents a tag with an attribute.
Before we begin let me start by defining what a table is and what it is used for. A table is a gridded structure of rows and columns used to hold and organize information. They are Not used to layout and create websites with, even though tables can be made to look quite good and very fancy.
Where do you type out your code?
A great place to write coding is in a text document using notepad on Windows or if you'd prefer to see a live preview of your work visit JSBin.com and type out the coding in the window on the left and see the preview on the right!
Without further ado, let's being!
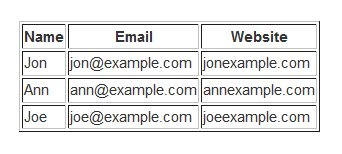
The Demo:
| Name | Website | |
|---|---|---|
| Jon | jon@example.com | jonexample.com |
| Ann | ann@example.com | annexample.com | Joe | joe@example.com | joeexample.com |
The Tutorial:
To create this table we'll need our main <table></table> tags, inner tags: <tr>, <th>, <td> and the border attribute. Simple right? If you don't think so, you'll soon find out how easy this really is, keep reading!Wait! What are the <tr>, <th>, <td> tags for, you didn't explain them? Great question! They're the tags we are going to use to help us place information inside our table and keep it organized.
The <tr> tag contains the row of cells used in the table.
The <th> tag is a table header (row title) typically displayed aligned in the center and in bold.
The <td> tag is a table data cell and contains the typed information.
First we need our table tags.
Example:
<table border="1">
</table>
Feel free to change the words Name, Email and Website to whatever you'd like them to say.
Example:
<table border="1">
<tr>
<th>Name</th>
<th>Email</th>
<th>Website</th>
</tr>
</table>
To add the information of your choice simply replace Jon, john@example.com and jonexample.com.
Example:
<table border="1">
<tr>
<th>Name</th>
<th>Email</th>
<th>Website</th>
</tr>
<tr>
<td>Jon</td>
<td>jon@example.com</td>
<td>jonexample.com</td>
</tr>
</table>
Complete HTML:
<table border="1">
<tr>
<th>Name</th>
<th>Email</th>
<th>Website</th>
</tr>
<tr>
<td>Jon</td>
<td>jon@example.com</td>
<td>jonexample.com</td>
</tr>
<tr>
<td>Ann</td>
<td>ann@example.com</td>
<td>annexample.com</td>
</tr>
<tr>
<td>Joe</td>
<td>joe@example.com</td>
<td>joeexample.com</td>
</tr>
</table>

No comments:
Post a Comment